Question & Answer
Question
How do I use IBM Installation Manager to install interim fixes from a local repository?
Answer
Installation Manager works with repositories to install updates. A repository can be an online location that hosts the interim fix files and other configuration information or a local file system that contains the files.
If you do not have Installation Manager installed, download and install Installation Manager.
To install an interim fix, use the instructions in the Create a local repository section. Then, use one of the following three processes to use Installation Manager to install the interim fix or fixes:
- Install the interim fixes by using the Installation Manager user interface (See the Use the Installation Manager GUI section.).
- Silently install the interim fix or fixes by using the imcl command (See the Use the imcl command section.).
- Silently install the interim fix or fixes by using a response file (See the Use a response file section.).
Notes:
* For a network deployment environment, the interim fix should be installed on the deployment Manager and all the nodes associated with the cell.
* Review the readme file associated with the interim fix for any post interim fix installation requirements.
* For IBM Business Process Manager and IBM Integration Designer V8.5 and later, as well as IBM Business Automation Workflow V18.0 and later , you can use the interim fix .zip file as the local repository. Extracting the .zip file is not recommended.
Tab navigation
- Create a local repository
- Use the Installation Manager GUI
- Use the imcl command
- Use a response file
- Known issues
Create a local repository
For versions of these products earlier than V8.5, it might be necessary to create a local repository by extracting the fix files. If you are not extracting the fix files, go directly to either the Use the Installation Manager GUI, Use the imcl command, or Use a response file section.
The directory location where you extract the interim fix files becomes your local repository. Select the appropriate location and extract the compressed files.
For example, if you have downloaded wps_7.0.0.0-WS-WBI-IFJR35042.zip, you may, optionally, extract it into the chosen directory:
bash-2.05$ pwd
/home/wpsuser
bash-2.05$ mkdir JR35042
bash-2.05$ unzip wps_7.0.0.0-WS-WBI-IFJR35042.zip -d JR35042
Archive: wps_7.0.0.0-WS-WBI-IFJR35042.zip
inflating: JR35042/repository.xml
inflating: JR35042/atoc/atoc.xml
creating: JR35042/atoc/nq/
inflating: JR35042/atoc/nq/native_file.xml
inflating: JR35042/files/7.0.0.0-WS-WBI-IFJR35042_7.0.0.0.pak
inflating: JR35042/Fixes/JR35042_WBI-ESB_7.0.0.20091210_1320.fix
inflating: JR35042/Fixes/toc.xml
inflating: JR35042/ShareableEntities/7.0.0.0-WS-WBI-IFJR35042_7.0.0.20091210_1320.assembly
inflating: JR35042/ShareableEntities/com.ibm.ws.WPS.server.fix.2_7.0.0.20091210_1320.su
inflating: JR35042/ShareableEntities/toc.xml
inflating: JR35042/repository.config
bash-2.05$
In this example, the location to which the files were extracted, /home/wpsuser/JR35042, becomes the local repository to install the interim fix. The directory used for local repository should contain repository.config file
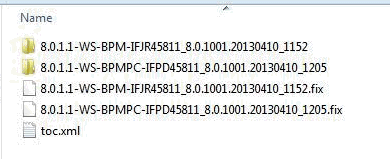
Note: In some cases, when you extract the file, you might see multiple repositories. For example, for the desktop Process Designer, interim fixes are packaged with Process Center or Workflow Center interim fixes, as shown in the following screen capture:

Important: When you use the imcl command or you create a response file for a silent installation, make sure that you include both of the Fix IDs when you complete the instructions that follow in this document.
Use the Installation Manager GUI
Complete the following steps:
1. Add the local repository folder to Installation Manager:
a. Start IBM installation Manager.
b. From the Start page, click File > Preferences > Repositories.
c. From the Repositories page, click Add Repository:

d. In the Add Repository window, browse to the local repository you created for the interim fix files.
e. Select the repository.config file and then click Open.
f. From the Repositories page, click OK.
2. From the Installation Manager home page, click Update, and then select the installation that you want to update. Installation Manager goes through the repository list, which includes the repository that you just added, and provides a list of packages.
Note: If you select Update All and a package does not have recommend fixes, you receive the following error:
No updates or fixes were found for the packages that are installed in the selected locations.
A package might have fixes that are not recommended. To update packages with fixes that are not recommended or to update a specific package, select the package group that contains the package.
3. Select the fix (or fixes) that you want to install and then click Next. Installation Manager installs the selected fix or fixes.
Use the imcl command
You can silently install an interim fix. You might use this approach if you do not have access to the Installation Manager user interface.
Make sure that you have upgraded Installation Manager to the latest version. The imcl command, which is described in this section, works only for Installation Manager V1.4 and later.
Complete the following steps:
- Open a command prompt, and change directories to the Installation_Manager_Install_Location/eclipse/tools directory.
where Installation_Manager_Install_Location is the location where Installation Manager is installed. For more information, see Table 4 in Installation Manager default installation directories. - Run the following command after updating it appropriately:
imcl install <fix_ID> -repositories <repository pacKage|location> -installationDirectory <install_dir> -log <log_location>
a. Replace <fix_ID> with the ID for the interim fix. You can find this ID in the repository.xml file for the fix repository.
b. Replace <repository package|location> with the actual local directory where you extracted the interim fix.
c. Replace <install_dir> with the location where the product is installed.
d. Replace <log_location> with the location and file name of the log file.
Example
cd /opt/IBM/InstallationManager/eclipse/tools
imcl install 7.5.0.0-WS-BPMADVWESB-IFJR39658 -repositories /home/wpsuser/IFix/JR39658 -installationDirectory /opt/IBM/BPM75 -log JR3965fixLog.txt
Notes:
- If your operating system is Microsoft Windows 7, Vista, or Windows 2008, start your command prompt by right-clicking the window and selecting run as administrator. This process ensures that the commands you invoke are run with administrator privileges.
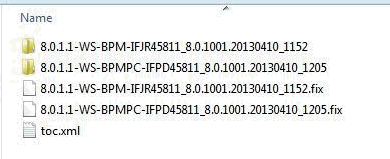
- In some cases, when you extract the file, you might see multiple repositories. For example, Process Designer interim fixes are packaged with Process Center or Workflow Center interim fixes:

- When you use the imcl command to install the interim fix, make sure that you include both of the Fix IDs, for example
imcl install 8.0.1.1-WS-BPM-IFJR45811 8.0.1.1-WS-BPMPC-IFPD45811 -repositories /tmp/IFixJR45811 -installationDirectory /opt/IBM/BPM801 -log /tmp/IFixJR45811fixLog.txt
- Review the readme file for the respective interim fix for further post installation instructions.
Use a response file
You can create a response file to be able to silently install an interim fix.
A template response example is included here. Customize it as described in the following instructions.
![]()
<?xml version="1.0" encoding="UTF-8"?>
<!--
#######################################
# If you have read and agree to the license agreement, change acceptLicense to true.
#######################################
-->
<agent-input acceptLicense='false'>
<!--
################ REPOSITORY LOCATION #######
# Provide the location where the repositories can be found.
# This can either be a folder on your local system or a URL location
# within your Intranet.
# The location should be enclosed in single quotes.
#############################################
-->
<server>
<repository location='<repository_location>'/>
</server>
<!--
############## INTERIM FIXES TO INSTALL #########
# profile: Provide the ID of the package where WebSphere Application
# Server ND v7.0.0.7 or later was installed.
# This ID can be obtained from the installed.xml file found in
# Linux/Unix: /var/ibm/InstallationManager (root user)
# or /home/<user>/var/ibm/InstallationManager (non-root user)
# Windows: C:\Documents and Settings\All Users\Application
# Data\IBM\Installation Manager from the following element:
# <location id='IBM WebSphere Application Server - ND' kind='product'
# path='/export/home/wps/wpsv7/ProcServer'>
#
# Select the ID of the WebSphere Process Server location that you want
# to install this fix onto.
# e.g. id='IBM WebSphere Application Server - ND_20091213_1600' if you
# used the Launchpad to install and import your WebSphere Application
# Server. If you manually installed and imported WebSphere Application
# Server, the ID is likely IBM WebSphere Application Server - ND (ND_1,
# ND_2, etc...)
#
# id: ID of the Fix being installed.
# version: version of the Fix being installed.
# This can be obtained from the repository.xml under the unzipped fix
# location.
# <fix id='JR35042_WBI;ESB' version='7.0.0.20091210_1320' .... >
#####################################################
-->
<install modify='false'>
<offering profile='<profile_ID>' id='<fix_ID>' version='<fix_Version>' />
</install>
<preference value='30' name='com.ibm.cic.common.core.preferences.connectTimeout'/>
<preference value='30' name='com.ibm.cic.common.core.preferences.readTimeout'/>
<preference value='0'
name='com.ibm.cic.common.core.preferences.downloadAutoRetryCount'/>
<!--
#####################################################
# If you have internet access then set the value of
# 'offering.service.repositories.areUsed' to true, otherwise leave it as false
#####################################################
-->
<preference value='false' name='offering.service.repositories.areUsed'/>
<preference value='false'
name='com.ibm.cic.common.core.preferences.ssl.nonsecureMode'/>
<preference value='false'
name='com.ibm.cic.common.core.preferences.http.disablePreemptiveAuthentication'/>
<preference value='true'
name='com.ibm.cic.common.core.preferences.preserveDownloadedArtifacts'/>
<preference value='false' name='PassportAdvantageIsEnabled'/>
<!--
#####################################################
# If you have internet access then set the value of
# 'com.ibm.cic.common.core.preferences.searchForUpdates' to true, otherwise leave it
# as false
#####################################################
-->
<preference value='false'
name='com.ibm.cic.common.core.preferences.searchForUpdates'/>
<preference value='true' name='com.ibm.cic.common.core.preferences.import.enabled'/>
</agent-input>
Complete the following steps:
- Create a response file starting with the previous template, for example JR35042-responsefile.xml.
- Save it to the local repository that you created for the interim fix files.
- Edit the response file to make the following changes. See the example values in the response file section for information about the current installation values.
a. Specify the local repository. Replace <repository_location> with the actual repository location, for example
<repository location='/home/wpsuser/JR35042'/>
b. Specify the profile ID, fix ID, and fix version.
c. Replace the <profile_ID> variable with the package ID that you used when you installed the products.
Note: The profile in Installation Manager refers only to a binary installation location.
You can obtain this ID from the installed.xml file, which is located in the following directories:
Linux or UNIX-based operating systems:
/var/ibm/InstallationManager (root user)
or
/home/<user>/var/ibm/InstallationManager (non-root user)
Windows operating systems:
C:\Documents and Settings\All Users\Application Data\IBM\Installation Manager from the following element:
<location id='IBM WebSphere Application Server - ND' kind='product' path='/export/home/wps/wpsv7/ProcServer'>
d. Select the ID of the product location where you want to install this fix. For example, select id='IBM WebSphere Application Server - ND_20091213_1600' if you used the Launchpad to install and import your WebSphere Application Server. If you manually installed and imported WebSphere Application Server, the ID is likely IBM WebSphere Application Server - ND (ND_1, ND_2, and so on).
e. Replace the <fix_ID> variable with the ID for the interim fix. You can find this value in the repository.xml file for the fix repository.
f. Replace the <fix_version> value with the version number for the interim fix. You can also find this value in the repository.xml file for the fix repository. This value is located in the following element within the repository.xml file:
<fix id="JR35042_WBI;ESB" version="7.0.0.20091210_1320" offeringId="com.ibm.ws.WPS" offeringVersion="7.0.0.20091130_1017">
Sample
<offering profile='IBM WebSphere Application Server - ND' id='JR35042_WBI;ESB'
version='7.0.0.20091210_1320' />
g. Save the updated response file.
h. For Installation Manager 1.4 and later, you can use the following imcl command to install the interim fix: imcl input response_file_path_and_name
Example
cd /opt/IBM/InstallationManager/eclipse/tools
imcl input /home/wpsuser/JR35042/JR35042-responsefile.xml -log
/home/wpsuser/JR35042/JR35042IfixInstall.log.xml
For an earlier version of Installation Manager, run the IBMIM or IBMIMC (Windows only) command from the /eclipse directory under IBM Installation Manager, as shown in the following example:
bash-2.05$ ./IBMIM "--launcher.ini" silent-install.ini -input /home/wpsuser/JR35042/JR35042-responsefile.xml -log /home/wpsuser/JR35042/JR35042IfixInstall.log.xml
The installation log file, which you specify using the -log parameter, does not contain any error messages if the interim fix installation is successful.
Known issues
Problem: Installation Manager indicates that the md5 digest values do not match when you attempt to install IBM Business Process Manager Version 8.0 with multiple interim fixes that are bundled together.
Solution: Use the interim fix .zip file as the local repository without extracting the .zip file. For more information, see the Attempting to install multiple interim fixes for IBM Business Process Manager (BPM) results in a md5 digest matching error in Installation Manager document.
Related Information
Product Synonym
BPM; BAW; IID
Was this topic helpful?
Document Information
Modified date:
09 November 2018
UID
swg21417656