Troubleshooting
Problem
This document provides information on printing using Magnetic Ink Character Recognition (MICR) fonts from the IBM Power Systems.
Resolving The Problem
Magnetic Ink Character Recognition (MICR) was introduced by the banking industry in the middle part of the 20th century to help speed up the processing of checks. Those funny looking numbers and characters that are found on the bottom of a check are printed in a magnetically coded ink that can be read by special MICR readers.
It is possible to print using a MICR font on the IBM Power Systems, however, you have to take into account the type of printer you are printing on.
This document was last updated on 23 January 2015.
IPDS Printers
There are no known IPDS printers that contain a resident IPDS MICR font. This means that you have to download a font resource object (an object with type *FNTRSC) to the printer. Right away, you can eliminate the IBM 4224, 4230, 4247, and 6400 series of IPDS line matrix printers, as well as the Infoprint 6500 IPDS line matrix printers, since none of these printers support the downloading of fonts. Most laser-type printers support the downloading of font resources. However, not only does the printer have to support downloaded fonts, it has to specifically support MICR printing. This is normally an additional upgrade that must be done to the printer, which includes special magnetic toner. The device description for the IPDS printer has to specify AFP(*YES), which requires the purchase of a PSF/400 license.
After you have determined that your printer supports downloaded font resources and also has MICR capability, you now need a MICR font resource object that can be downloaded to your printer. The operating system does not come with a MICR font. Likewise, the IBM AFP Font Collection (5648-B45) does not contain a MICR font. IBM does market an RPQ, 8A8083, with MICR font resources.
MICR fonts were previously provided through RPQ 8A8083. An RPQ, Request for Price Quotation, is a method IBM uses to provide special hardware and software products and features. RPQ 8A8083 is no longer available, but an enhanced version of the fonts provided with the RPQ available to be downloaded from the IBM Software FTP site. For more information, refer to the section titled "Downloading MICR Fonts from the IBM Software FTP Site" below. These fonts were specifically designed for IBM Infoprint 4000 printers, but they may work on other printer models as well.
There are three types of font resource objects: font character sets, code pages, and coded fonts. Font character set names start with C0 or CZ, code pages start with T1, and coded fonts start with X0 or XZ. A font character set and a code page are both needed to print using font resource objects. A coded font is merely a shorthand method of specifying a font character set and code page. For example, if you have font character set C0R0AE13 and code page T1001032, there is probably a coded font X0AE13 that combines this combination. You must put these font resource objects in a library specified through the Device resource library list (DEVRSCLIBL) parameter in the PSF configuration object (PSFCFG), which when set to *DFT would consist of the QFNTCPL library, and QFNT01 - QFNT15, and QFNT61 - QFNT65 libraries.
Font resource objects are of two general types, raster and outline. Raster fonts are built using a specific pel density, usually either 240 or 300 pel. Outline fonts are not specific to a pel density, but the printer you are printing on has to support the outline font technology. If the font character set name starts with C0, it is probably a raster font. The Display Font Resource Attr (DSPFNTRSCA) command can be used to display the pel density of a raster font. If the name starts with CZ, it is probably an outline font. The DSPFNTRSCA command will show you a special value of *OUTLINE under the pel density field.
If you obtain a raster MICR font, ensure that the pel density of the MICR font resource matches the pel density of the printer.
The spooled file that downloads this font resource object has to specify a printer device type of *AFPDS. A MICR font only contains characters 0-9, and four other special characters. Therefore, you will not want to print a complete check using MICR. To print part of a spooled file in a normal font, and just particular fields using MICR, you must use DDS specifications in a printer file.
Note: For more information on loading host-resident MICR fonts onto the Power Systems, refer to the section titled "Information on Transferring Fonts to the Operating System" below.
CDEFNT (Coded Font) and FNTCHRSET (Font Character Set) DDS Keywords
If you have coded fonts to go along with the font character set and code page, it is easiest to use the CDEFNT (Coded Font) DDS keyword and simply specify the name of the coded font object. For example:
| CDEFNT(QGPL/X0AE13) CDEFNT(QGPL/X0ACMC) |
Otherwise, you must use the FNTCHRSET (Font Character Set) DDS keyword and specify both the font character set and the code page names. For example:
| FNTCHRSET(QGPL/C0R0AE13 QGPL/T1001032) FNTCHRSET(QGPL/C0R0ACMC QGPL/T1001032) |
Note: For more information on the CDEFNT and FNTCHRSET DDS keywords, refer to the System i Programming DDS for Printer Files V6R1, which is available at:
http://publib.boulder.ibm.com/infocenter/iseries/v6r1m0/topic/rzakd/rzakd.pdf
or the System i Programming DDS for Printer Files V5R4, which is available at:
http://publib.boulder.ibm.com/infocenter/iseries/v5r4/topic/rzakd/rzakd.pdf
Secure vs Non-Secure MICR Fonts
If printing to a MICR-capable IPDS laser printer that requires non-secure fonts, you will need to obtain a non-secure MICR font from your printer manufacturer or from a third-party vendor and import the font character set, code page and coded font into your IBM System i server. If you use the Infoprint Designer for iSeries product to design your checks, then the font character set, code page and coded font will need to be added to Infoprint Designer as well.
An alternative would be to use the secure MICR fonts that are available from Infoprint Designer and the IBM Software FTP site and print to your MICR-capable printer using a *LAN 3812 device description, a Remote Output Queue (RMTOUTQ) or a PC5250 printer session that uses Host Print Transform (HPT), rather than printing through a *LCL or *LAN IPDS device description that uses Print Services Facility/400 (PSF/400). HPT will build a raster or bit-map image of the MICR characters using the MICR fonts available on the IBM System i, rather than attempting to temporarily load the secure MICR font into the printer hardware.
Error Conditions when Printing to an IPDS Printer
If the MICR font is not found in one of the device resource libraries, which by default would consist of the QFNTCPL library, and QFNT01 - QFNT15, and QFNT61 - QFNT65 libraries, then the spooled file will most likely print without the MICR font and with message PQT3535 "Font substitution was performed" being issued to the WTR job log.
If the MICR font is found but has the wrong pel density for the printer hardware, then the spooled file will most likely print without the MICR font and with message PQT3535 being issued to the WTR job log as well.
If the MICR font is found and is of the correct pel density for the printer hardware, but the printer hardware is not a MICR capable IPDS printer or does not have the MICR feature enabled, then the spooled file will most likely go to HLD (Held) status with message PQT3330 "MICR printing is not supported or not available on device IP1140IPDS" being issued to the PDJ job log.
Using Infoprint Server to Generate PDFs that use MICR Fonts
As mentioned above, when printing to an IPDS printer, the pel density of the MICR font resource object must match the pel density of the printer. If not, then anything in the MICR font will fail to print because the pel density does not match.
Infoprint Server emulates an IPDS laser printer and utilizes Print Services Facility/400 (PSF/400) in the process of converting spooled files to PDF. Infoprint Server has the same requirement to match the pel density of the MICR font resource object with the pel density of its printer emulation type, which is determined by the PDF device emulation type (PDFDEVTYPE) parameter in the PSF Configuration (PSFCFG) object.
The following chart shows the pel density for each of the supported values for the PDFDEVTYPE parameter.
| Pel Density Chart | ||
| PDFDEVTYPE | Description | Pel Density |
| *IP40240 | Emulate an IP40 printer device configured at 240 pel resolution. | 240 |
| *IP40300 | Emulate an IP40 printer device configured at 300 pel resolution. | 300 |
| *P4028 | Emulate a 4028 printer device. | 240 |
| *P3812 | Emulate a 3812 printer device. | 300 |
Therefore, if 300 pel MICR fonts are used but the PDFDEVTYPE parameter is set to *IP40240 or *P4028, the resulting PDF file will not include anything in the MICR font because the pel density does not match. Likewise, the resulting PDF file will not include anything in the MICR font if 240 pel MICR fonts are used but the PDFDEVTYPE parameter is set to *IP40300 or *P3812.
Using Transform Services to Generate PDFs that use MICR Fonts
Transform Services is a license-free product that can be used to generate Adobe Acrobat PDF format on an IBM i or i5/OS system.
First available in V6R1M0 (6.1 or R610) i5/OS, the Transform Services product (5761TS1) can be used to directly generate PDF as streams files in the Integrated File System (IFS). However, the 6.1 version is not capable of rendering non-Latin1 text, including text in a Magnetic Ink Character Recognition (MICR) font.
To use Transform Services to generate PDFs that include text in a MICR font your system must have both V7R1M0 (7.1) i5/OS and the 7.1 version of Transform Services (5770TS1) installed.
For more information on Transform Services, please refer to the following documents:
N1018568: Using Transform Services to Generate PDF Stream Files instead of Spooled Files
N1013755: Language Support for Host Print Transform and Transform Services
Note: The Infoprint Server for iSeries licensed product (5722IP1) can be used to generated PDFs that include the MICR at both 7.1 and 6.1, as well as V5R4M0 (5.4 or R540) i5/OS and earlier releases.
ASCII Printers
When printing to an ASCII laser printer, there are two ways of printing MICR fonts depending on whether the printer has a MICR font that is loaded in the printer hardware (which is known as a printer-resident MICR font), or whether you will be using a MICR font that is loaded on the operating system (which is known as a host-resident MICR font). In either case, because it is not an IPDS printer, the operating system has no idea if the printer actually has magnetic toner or not. The operating system will simply rasterize the look of the font and send it to the printer. You also do not need to worry about the pel density of the font resource object because Host Print Transform (HPT) will rasterize it to fit the printer resolution.
ASCII Printers That Have a Printer-Resident MICR Font
If the ASCII laser printer has a printer-resident MICR font, then there are a few ways to select that printer-resident font by sending a particular PCL font string to the printer. There are also some OEM MICR font packages that can be purchased and then used to load a printer-resident MICR font into the printer. If an OEM MICR font package is used, the manufacturer of that package should include the PCL font string that would be used to activate the MICR font.
After a MICR font has been loaded into the printer and its PCL font string is known, it can be selected by embedding the PCL font string for the MICR font in a spooled file or by modifying a Workstation Customizing Object (WSCST) to include an Individual Font Entry (INDFNTE) tag that maps a unique font identifier (or FGID) to the PCL font string for the MICR font.
The recommended way is to use a modified WSCST object that has an INDFNTE tag with the PCL font string for the MICR font and then reference the FGID for that font in the FONT DDS keyword. This is preferred because DDS will automatically handle change the font back after the necessary text has been printed in the MICR font. Otherwise, the spooled file would have to embed the PCL font string for the MICR font and for the default font.
The following is an example of using the FONT DDS keyword to specify a particular FGID for text that is to be printed in a MICR font:
| R RECORD1 FONT(86) NAME 20 4 4 AMOUNT 10S 2 4 54 AMTTXT 50 6 4 MICR 30 23 4FONT(35) |
The text that will print in the MICR font is set up to print using font or FGID 35. The rest of the check prints using font or FGID 86. Then in the workstation customizing object, you would insert a INDFNTE tag that maps font 35 to a PCL font string that activates the MICR font. The FNTSTR is the hexadecimal PCL command that activates the MICR font.
| :INDFNTE FID= 35 POINTSIZE= 0 FNTSTR='1B28733170313276307330623431303154'X FNTEND=''X FNTWTH=''X EURODATA=''X. |
Note: The above example does not use a valid PCL font string for a MICR font. The correct font string to use must be supplied by the printer manufacturer or by the manufacturer of the OEM MICR font package.
The advantage to this method is that the operating system automatically switches the font back for you after the field has printed.
Another way to get the PCL string to the printer is to imbed the string into the spooled file. If you do this, you are responsible to not only imbed the data that switches to the MICR font, but also to change the font back after you have printed the MICR data. There are two ways to imbed a control string in the spooled file. The first is to use ASCII transparency and code in the exact ASCII control string in hexadecimal.
For more information on using the ASCII Transparency (ATRN) SCS control, please refer to the following document:
N1010220: Using the ASCII Transparency (ATRN) SCS Control to Pass ASCII Data to a Printer
Note: You do not need to be using Host Print Transform (HPT) to use this method.
The second way to imbed your own control strings does involve host print transform. Let us assume that the manufacturer of the MICR font tells you that you must send <esc>(10U<esc>(s0p10h0s0b4099T as the control string. This is not hexadecimal data, but character data. All of this data will translate to ASCII cleanly except for the <esc> character. We have denoted this as <esc> but, in reality, it is a single character. In ASCII hexadecimal, it is a x'1B'. The problem is that the operating system does not translate any single character into x'1B'. If you use host print transform, you can set up a workstation customizing object that maps some unique character that you choose into a x'1B'. For example, you could choose the exclamation point (!) to be your escape character, and map the exclamation point to x'1B' using a workstation customizing object with its own translation table.
For more information on sending the MICR font string in a user-modified workstation customizing object, please refer to the following document:
N1010137: Customizing the Code Page 37 to 437 Translation Table
ASCII Printers That Do Not Have a Printer-Resident MICR Font
If a printer-resident MICR font is not available, then a host-resident MICR font can be used instead. Follow the instructions for IPDS printers to setup a host-resident MICR font. After a host-resident MICR font has been set up on the operating system, it can be printed on the ASCII laser printer by specifying that MICR font in an *AFPDS spooled file using the FNTCHRSET (Font Character Set) DDS keyword and then modifying a Workstation Customizing Object (WSCST) to use Raster Mode for *AFPDS spooled files. Host Print Transform (HPT) will then convert the host-resident font to a rasterized image using its AFPDS to ASCII Transform code.
For more information on loading host-resident MICR fonts onto the system, refer to the section titled "IPDS Printers" above, and the section titled "Information on Transferring Fonts to the Operating System" below.
Common Errors with Using MICR Fonts
If you are printing to an IPDS printer, or are using Infoprint Server to convert spooled files to PDF, the most common errors are the following:
| 1. | The operating system cannot find the font character set and/or code page. Ensure that you place the *FNTRSC objects into a library that the writer job can find. QGPL is normally a library that will be found by the writer job. |
| 2. | We find the font objects, but they are not in the correct pel density. Use the Display Font Resource Attr (DSPFNTRSCA) command to find out what pel density your font uses. If you do not know what pel density your printer uses and you have a Support Line contract, Support Line personnel can help you run a trace to find out what pel density your printer uses. If using Infoprint Server to convert spooled files to PDF, the pel density is determined by the PDF device emulation type (PDFDEVTYPE) parameter in the PSF Configuration (PSFCFG) object. |
| 3. | We find the font objects, they are the correct density; however, your printer does not support MICR fonts. Again, Support Line personnel can help you with a trace that will determine if your printer is telling us it is MICR-capable. |
| 4. | You have correctly coded the DDS that is required; however, when you created the printer file from the DDS, you did not specify DEVTYPE(*AFPDS). It must be *AFPDS to correctly process the CDEFNT or FNTCHRSET DDS keyword. |
If you are printing to an ASCII printer and the MICR is not printing, the most common error is the following:
| o | If you are using host print transform and the CDEFNT or FNTCHRSET DDS method, see 1 and 4, above. |
After you get into workstation customizing or into using ASCII transparency, you might need to purchase a consulting agreement to have IBM support personnel debug your customization. We have consultants who are trained to take the correct traces and dumps that will help detect if your workstation customization object is doing what it is supposed to do. Please note that if you have purchased a MICR font for your ASCII printer, IBM cannot tell you what the control string is to activate it. You must get that information from the manufacturer of the MICR font.
-
 Downloading MICR Fonts from the IBM Software FTP Site
MICR fonts were previously provided through RPQ 8A8083. An RPQ, Request for Price Quotation, is a method IBM uses to provide special hardware and software products and features. RPQ 8A8083 is no longer available, but an enhanced version of the fonts provided with the RPQ is available to be downloaded from the IBM Software FTP site at the following URL:
ftp://ftp.software.ibm.com/printers/products/fonts/micr
Warning: These MICR fonts are provided "AS IS". These fonts were specifically designed for IBM Infoprint 4000 printers and may work on other printer models as well, but they are not supported with any other printer hardware and are not guaranteed to work with any other printer hardware. If these fonts do not work properly with any particular printer model they you may need to acquire fonts from your MICR-provider that can be either loaded onto the IBM i System or loaded into the printer hardware.
The 4000micr.txt file is a readme file that contains details on the files shipped with this MICR font package and provides information on how to install the fonts on an MVS, OS/390, z/OS, VM, or VSE system and how to install the fonts on Infoprint Manager for AIX and Windows. The 4000micr.txt file does not provide information on how to install the fonts on an IBM System i, but this document does provide that information.
The 4000micr.zip file contains the MICR font package (the MICR character sets, code pages and coded fonts).
The MICR font package includes the following font character sets:
Font Character Sets Provided in the MICR Font Package Character Set Description C0R0AE13.240 240-pel production version of MICR E-13B C0R0AE13.300 300-pel production version of MICR E-13B C0R0AT13.240 240-pel hollow test version of MICR E-13B C0R0AT13.300 300-pel hollow test version of MICR E-13B C0R0ACMC.300 300-pel production version of MICR CMC-7
The MICR font package includes the following code pages:
Code Pages Provided in the MICR Font Package Code Page Description T1001032 MICR E-13B code page T1001033 MICR CMC-7 code page
The MICR font package includes the following coded fonts:
Coded Fonts Provided in the MICR Font Package Coded Font Description x0ae13 MICR E-13B coded font for production use x0at13 MICR E-13B coded font for testing x0acmc MICR CMC-7 coded font for production use
Uploading and Creating the 300-pel MICR E-13B Font Resources
The 300-pel MICR E-13B font resources can be uploaded to an IBM System i by downloading the 4000micr.zip file to a PC, unzipping the file to a temporary directory (such as C:\4000micr), launching a Windows Command Prompt and then using FTP in binary mode, for example:
CD C:\4000micr
FTP <system-name-or-ip-address>
<user-profile>
<password>
BIN
PUT C0R0AE13.300 QGPL/MICR.C0R0AE13
PUT C0R0AT13.300 QGPL/MICR.C0R0AT13
PUT T1001032 QGPL/MICR.T1001032
PUT X0AE13 QGPL/MICR.X0AE13
PUT X0AT13 QGPL/MICR.X0AT13
QUIT
After the objects have been uploded to the system, the font resources can be created using the following Create Font Resource (CRTFNTRSC) commands:
CRTFNTRSC FNTRSC(QGPL/C0R0AE13) FILE(QGPL/MICR) MBR(*FNTRSC)
TEXT('300-pel production version of MICR E-13B')
CRTFNTRSC FNTRSC(QGPL/C0R0AT13) FILE(QGPL/MICR) MBR(*FNTRSC)
TEXT('300-pel hollow test version of MICR E-13B')
CRTFNTRSC FNTRSC(QGPL/T1001032) FILE(QGPL/MICR) MBR(*FNTRSC)
TEXT('MICR E-13B code page')
CRTFNTRSC FNTRSC(QGPL/X0AE13) FILE(QGPL/MICR) MBR(*FNTRSC)
TEXT('MICR E-13B coded font: 300-pel production version')
CRTFNTRSC FNTRSC(QGPL/X0AT13) FILE(QGPL/MICR) MBR(*FNTRSC)
TEXT('MICR E-13B coded font: 300-pel hollow test version')
Uploading and Creating the 240-pel MICR E-13B Font Resources
The 240-pel MICR E-13B font resources can be uploaded to an IBM System i by downloading the 4000micr.zip file to a PC, unzipping the file to a temporary directory (such as C:\4000micr), launching a Windows Command Prompt and then using FTP in binary mode, for example:
CD C:\4000micr
FTP <system-name-or-ip-address>
<user-profile>
<password>
BIN
PUT C0R0AE13.240 QGPL/MICR.C0R0AE13
PUT C0R0AT13.240 QGPL/MICR.C0R0AT13
PUT T1001032 QGPL/MICR.T1001032
PUT X0AE13 QGPL/MICR.X0AE13
PUT X0AT13 QGPL/MICR.X0AT13
QUIT
After the objects have been uploaded to the system, the font resources can be created using the following Create Font Resource (CRTFNTRSC) commands:
CRTFNTRSC FNTRSC(QGPL/C0R0AE13) FILE(QGPL/MICR) MBR(*FNTRSC)
TEXT('240-pel production version of MICR E-13B')
CRTFNTRSC FNTRSC(QGPL/C0R0AT13) FILE(QGPL/MICR) MBR(*FNTRSC)
TEXT('240-pel hollow test version of MICR E-13B')
CRTFNTRSC FNTRSC(QGPL/T1001032) FILE(QGPL/MICR) MBR(*FNTRSC)
TEXT('MICR E-13B code page')
CRTFNTRSC FNTRSC(QGPL/X0AE13) FILE(QGPL/MICR) MBR(*FNTRSC)
TEXT('MICR E-13B coded font: 240-pel production version')
CRTFNTRSC FNTRSC(QGPL/X0AT13) FILE(QGPL/MICR) MBR(*FNTRSC)
TEXT('MICR E-13B coded font: 240-pel hollow test version')
Uploading and Creating the 300-pel MICR CMC-7 Font Resources
The 300-pel MICR CMC-7 font resources can be uploaded to an IBM System i by downloading the 4000micr.zip file to a PC, unzipping the file to a temporary directory (such as C:\4000micr), launching a Windows Command Prompt and then using FTP in binary mode, for example:
CD C:\4000micr
FTP <system-name-or-ip-address>
<user-profile>
<password>
BIN
PUT C0R0ACMC.300 QGPL/MICR.C0R0ACMC
PUT T1001033 QGPL/MICR.T1001033
PUT X0ACMC QGPL/MICR.X0ACMC
QUIT
After the objects have been uploaded to the system, the font resources can be created using the following Create Font Resource (CRTFNTRSC) commands:
CRTFNTRSC FNTRSC(QGPL/C0R0ACMC) FILE(QGPL/MICR) MBR(*FNTRSC)
TEXT('300-pel production version of MICR CMC-7')
CRTFNTRSC FNTRSC(QGPL/T1001033) FILE(QGPL/MICR) MBR(*FNTRSC)
TEXT('MICR CMC-7 code page')
CRTFNTRSC FNTRSC(QGPL/X0ACMC) FILE(QGPL/MICR) MBR(*FNTRSC)
TEXT('MICR CMC-7 coded font: 300-pel production version')
-
 Uploading and Creating the Font Resource Objects to the IBM System i
If you downloaded the font character set, code page, and coded font files from the Web site listed earlier in this document, the font resource or *FNTRSC objects can be created on your IBM System i or iSeries system by uploading the font resources to a physical file using Binary FTP and the running the Create Font Resource (CRTFNTRSC) command.
Note: Another option would be to import the font resources using the AFP Manager within iSeries Navigator, which is explained in the section titled "Importing the Font Resource Objects using iSeries Navigator" below.
Use the following step-by-step instructions to upload the font resources to a physical file and create the font resource or *FNTRSC objects using the Create Font Resource (CRTFNTRSC) command:
1. On the operating system, create a physical file to contain the object data. On an operating system command line, type the following:
CRTPF FILE(QGPL/MICR) RCDLEN(32766) MBR(*NONE) MAXMBRS(*NOMAX)
LVLCHK(*NO)
Press the Enter key.2. On the PC, get to a command prompt window, or the DOS window. Initialize a FTP session to the Power Systems. Type the following:
FTP xxx.xxx.xxx.xxx
where the x's are the TCP/IP address of the system. Press the Enter key.3. Type in your operating system user name and password when prompted. 4. Enter the bin command to send the data in binary mode. 5. Type the following:
put c:\dirname\charset.300 QGPL/MICR.charset300
where dirname is the directory where the PC file is, charset.300 is the name of the PC file, and charset300 is the member name in the physical file where the data will be placed.6. Repeat for the code page and coded fonts that you want to send across. Ensure you put them in separate members of the physical file. 7. On an operating system command line, type the following Create Font Resource (CRTFNTRSC) command:
CRTFNTRSC FNTRSC(QGPL/CHARSET) FILE(QGPL/MICR) MBR(*FNTRSC)
where CHARSET is the name of the *FNTRSC object that you want to create, and the name of the member in the QGPL/MICR physical file.8. Repeat for the code page and coded font, remembering to change the MBR value to the correct name. A font character set name should start with C0..., the code page should start with T1..., and a coded font should start with X0... 9. On an operating system command line, type the following Work with Font Resources (WRKFNTRSC) command to confirm that the font resources have all been created successfully:
WRKFNTRSC FNTRSC(QGPL/*ALL) OBJATR(*ALL)
-
 Importing the Font Resource Objects using iSeries Navigator
If you downloaded the font character set, code page, and coded font files from the Web site listed earlier in this document, the font resource or *FNTRSC objects can be created on your IBM System i or iSeries system by importing the font resources using the AFP Manager within iSeries Navigator.
Note: Another option would be to upload the font resources to a physical file using Binary FTP and then run the Create Font Resource (CRTFNTRSC) command, which is explained in the section titled "Uploading and Creating the Font Resource Objects to the IBM System i" above.
Use the following step-by-step instructions to import the font resources using the AFP Manager within iSeries Navigator:
1. Launch iSeries Navigator, expand the target IBM System i or iSeries system under My Connections, then click on AFP Manager.
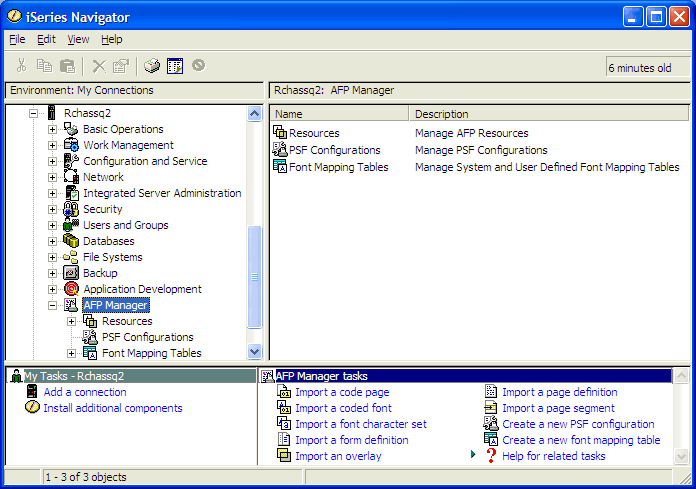
Note: This print screen shows the AFP Manager tasks within iSeries Navigator, which includes options to import a code page, coded font and font character set.2. To import a font character set, such as the 300-pel font character sets (C0R0AE13.300, C0R0AT13.300, and C0R0ACMC.300) or the 240-pel font character sets (C0R0AE13.240, and C0R0AT13.240) provided in the MICR Font Package, start by clicking on the "Import a font character set" task.
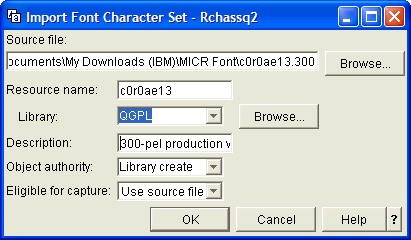
Press the Browse button and search for the font character set that you wish to import, type the font resource name to be used on the IBM System i or iSeries system, type the name of the library to be used (such as "QGPL"), type in a description (such as "300-pel production version of MICR E-13B"), specify the desired object authority, specify whether the font character set is eligible for capture at the printer, then click the OK button to import the font character set.
Note: Repeat this step of any other font character sets that you wish to import.3. To import a code page, such as the code pages (T1001032, and T1001033) provided in the MICR Font Package, start by clicking on the "Import a code page" task.
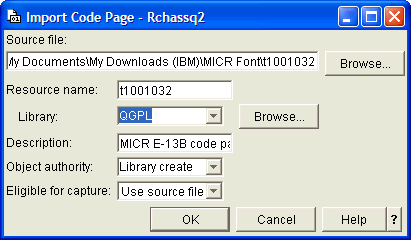
Press the Browse button and search for the code page that you wish to import, type the font resource name to be used on the IBM System i or iSeries system, type the name of the library to be used (such as "QGPL"), type in a description (such as "MICR E-13B code page"), specify the desired object authority, specify whether the code page is eligible for capture at the printer, then click the OK button to import the code page.
Note: Repeat this step of any other code pages that you wish to import.4. To import a coded font, such as the coded fonts (x0ae13, x0at13, and x0acmc) provided in the MICR Font Package, start by clicking on the "Import a coded font" task.
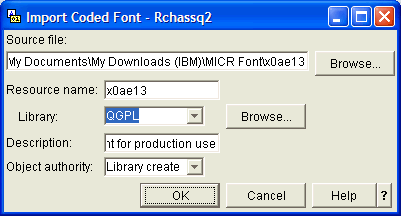
Press the Browse button and search for the font character set that you wish to import, type the font resource name to be used on the IBM System i or iSeries system, type the name of the library to be used (such as "QGPL"), type in a description (such as "MICR E-13B coded font for production use"), specify the desired object authority, then click the OK button to import the coded font.
Note: Repeat this step of any other coded fonts that you wish to import.5. On an operating system command line, type the following Work with Font Resources (WRKFNTRSC) command to confirm that the font resources have all been created successfully:
WRKFNTRSC FNTRSC(QGPL/*ALL) OBJATR(*ALL)
-
 Examples of the MICR Code Pages
Examples of the MICR Code Pages can be found in Adobe Acrobat PDF format on the IBM i Globalization Web page at the following URL:
http://www.ibm.com/systems/i/software/globalization/codepages.html
The MICR Code Pages listed on this Web site are:
Note: MICR-capable fonts might not have all of the MICR characters selectable at all code points, so you might need to try other code points to get the MICR characters to print successfully. For example, it appears that code points X'DB' (SO600000), X'CB' (SO610000), X'EB' (SO620000), and X'FB' (SO630000) work best on certain ASCII printers when using coded font X0AE13 or font character set C0R0AE13 and code page T1001032 (01032).
When looking at the MICR Code Pages 01032 and 01033, you might notice that the MICR characters are shown at a couple of different code points. The following tables show the character, description and code points (in hexadecimal) for E13-B and CMC-7:
MICR Characters for Code Page MICR, E13-B Combined (01032)
CharacterName (Description)EBCDIC Code Points
(in Hexadecimal)Corresponding
EBCDIC Character
(US/Canada Code Page 037)
SO600000Transit Symbol (SIV)X'C1'AX'5C'*X'7A':X'DB'û
SO610000Amount Symbol (SI)X'C2'BX'5B'$X'5E';X'CB'ô
SO620000On-Us Symbol (SII)X'C3'CX'4C'<X'61'/X'EB'Ô
SO630000Dash Symbol (SIII)X'C4'DX'60'-X'7E'=X'FB'Û
MICR Characters for Code Page MICR, CMC-7 Combined (01033)
CharacterName (Description)EBCDIC Code Points
(in Hexadecimal)Corresponding
EBCDIC Character
(US/Canada Code Page 037)
SO700000SIV Symbol, MICR (ISO)X'50'&X'7A':X'DB'û
SO710000SI Symbol, MICR (ISO)X'5E';X'61'/X'CB'ô
SO720000SII Symbol, MICR (ISO)X'4C'<X'5B'$X'EB'Ô
SO730000SIII Symbol, MICR (ISO)X'60'-X'7E'=X'FB'Û
SO740000SV Symbol, MICR (ISO)X'5C'*X'6E'>X'BB']
Note: The pictures used for the above tables were taken directly from the IBM GCGID: GCGID Table Specials, OCR/MICR Symbols: Globalizing your On Demand Business Web page, which is available at the following Web site:
http://www.ibm.com/software/globalization/gcgid/ocrsym.jsp
-
 Information on Using MICR Fonts within IBM Infoprint Designer for iSeries (5733ID1)
According to the Infoprint Designer for iSeries: Getting Started (Third Edition) manual, IBM Infoprint Designer for iSeries provides three MICR fonts in AFP format, which can be accessed from the Select Font dialog. These fonts are:
Font Files Provided as Unsupported MICR Samples File Name Contents C0R0AE13.300 E13B character set; true MICR font C0R0AT13.300 E13B character set; MICR test font; hollow characters C0R0ACMC.300 CMC-7 character set; true MICR font T1001032 E13B code page T1001033 CMC-7 code page X0AE13 Coded font for C0R0AE13 and T1001032 X0AT13 Coded font for C0R0AT13 and T1001032 X0ACMC Coded font for C0R0ACMC and T1001033
Although each special symbol in the E13-B and CMC-7 MICR fonts can be accessed using several different code points, Infoprint Designer limits which characters can be typed for these symbols. For example, when using the E13-B font supplied with Infoprint Designer, the Transit Symbol (SIV) must be typed using a colon (":"), the Amount Symbol (SI) has to be typed using a semi-colon (";"), the On-Us Symbol (SII) has to be typed using a forward slash ("/"), and the Dash Symbol (SIII) has to be typed using an equal sign ("=").
Notes:o All of the MICR fonts supplied by Infoprint Designer are 300 dpi raster fonts that were developed for use with the IBM 4028 printer and have not been verified to print acceptably on any other IBM printers or printers from other manufacturers. IBM does not claim that the use of these MICR fonts on any printer will meet the requirements of check-processing equipment. o Two of the MICR fonts provided will be accepted only by AFP printers that identify themselves as MICR-capable printers to PSF/400. If your AFP printer rejects these fonts, contact the vendor providing your MICR capability. o If you choose to print your MICR application on a PCL printer using Host Print Transform, these fonts will work; however, the guarantees provided by AFP for secure MICR printing will not be enforced. The third MICR font will be accepted by all printers, but it prints with hollow characters. This allows you to develop the overlays and layout to test your MICR application even if a MICR printer is not available. o If you have any other AFP MICR fonts on your PC that you want to use with Infoprint Designer, follow the instructions in the Infoprint Designer for iSeries: Getting Started manual to define the font to Infoprint Designer. o The Infoprint Designer for iSeries: Getting Started manual is available in Adobe Acrobat PDF format at the following Web site:
http://publib.boulder.ibm.com/prsys/pdfs/54457732.pdf
-
 Adding AFP Fonts to the Infoprint Designer Font Catalog
Notice: The instructions in this section are a slightly modified version of the instructions found in Appendix B, Additional Font Information, in the Infoprint Designer for iSeries: Getting Started (Third Edition), G544-5773-02, which is available online at:
http://publib.boulder.ibm.com/prsys/pdfs/54457732.pdf
If you have fonts in AFP format on your PC that you want to use with Infoprint Designer, such as MICR fonts from your MICR printer manufacturer or additional fonts from your third-party software vendor, you must first update the font catalog to reference them. You need to know if the fonts you are adding are in raster or outline format. If they are raster fonts, you need to know their resolution (240 or 300 dpi). IBM recommends that you keep these fonts in a separate directory from the AFP Font Collection that is installed with Infoprint Designer. The default directories used by Designer are \Designer\fonts\raster for raster fonts and \Designer\fonts\outline for outline fonts.
-
 Adding AFP Raster Fonts to the Infoprint Designer Font Catalog
Follow these step-by-step instructions add raster fonts to the Infoprint Designer font catalog:
1 Create a directory called "MYFONTS" in your DESIGNER directory (such as C:\DESIGNER) and save or unzip the AFP raster font objects to the \DESIGNER\MYFONTS directory. 2 Launch the Infoprint Designer for iSeries product and sign in with your user profile and password, but do not open a project. 3 Select Edit > Preferences from the menu bar and set the Host printer resolution to either 300 or 240, whichever resolution matches your IPDS printer hardware.
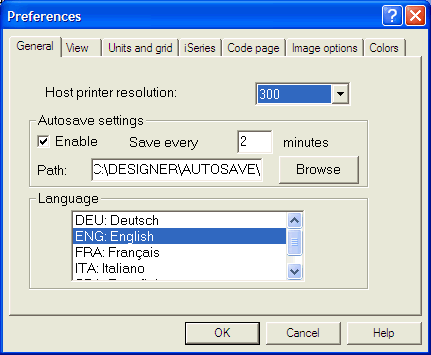
and then click on the OK button.
Note: If printing on an ASCII laser printer using Host Print Transform (HPT), then set the Host printer resolution to 300, since the AFPDS to ASCII Transform code within HPT converts everything to 300 dpi resolution.4 Select Edit > Change Library from the menu bar and select the \DESIGNER\USERISIS\raster.lbp file.
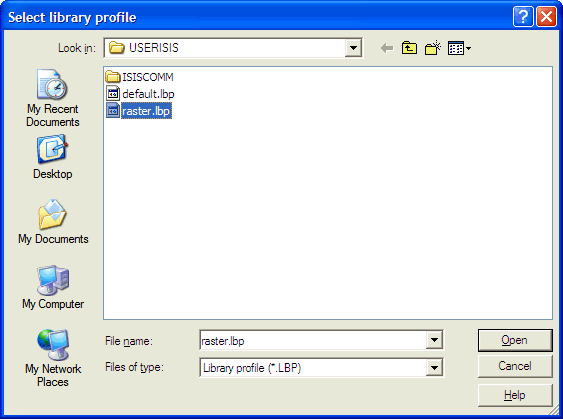
and then click on the Open button.5 Select Defaults > Libraries from the menu bar, select the Coded Font tab on the side.
If adding 300 dpi fonts, then select the 300 dpi tab on the bottom. If adding 240 dpi fonts, then select the 240 dpi tab instead.
Set the Path to "C:\DESIGNER\MYFONTS", and then click on the Append button.
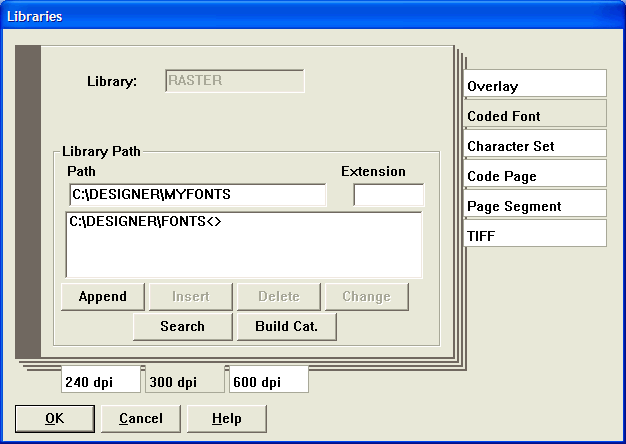
so both "C:\DESIGNER\FONTS<>" and "C:\DESIGNER\MYFONTS<>" paths are listed:
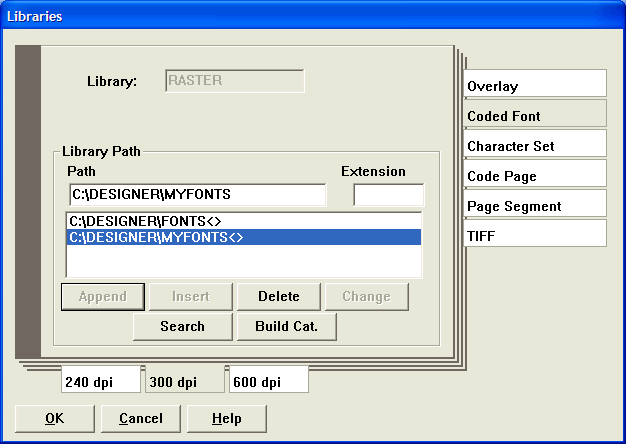
6 Select the Character Set tab on the side.
If adding 300 dpi fonts, then select the 300 dpi tab on the bottom. If adding 240 dpi fonts, then select the 240 dpi tab instead.
Set the Path to "C:\DESIGNER\MYFONTS", set the Extension to 300 or 240 (depending on whether you are adding 300 dpi or 240 dpi fonts), and then click on the Append button.
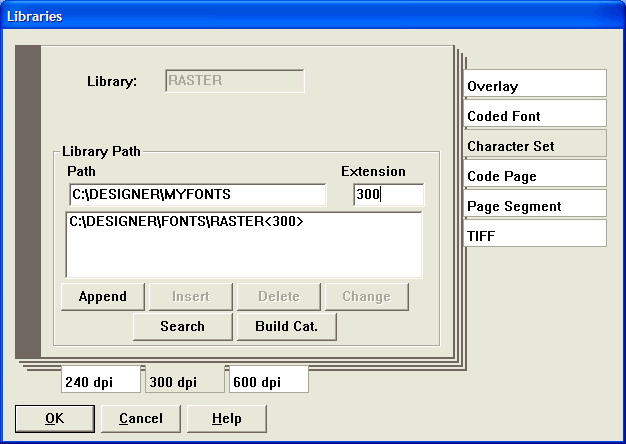
so both "C:\DESIGNER\FONTS\RASTER<300>" and "C:\DESIGNER\MYFONTS<300>" are listed if adding 300 dpi fonts, or both "C:\DESIGNER\FONTS\RASTER<240>" and "C:\DESIGNER\MYFONTS<240>" are listed if adding 240 dpi fonts:
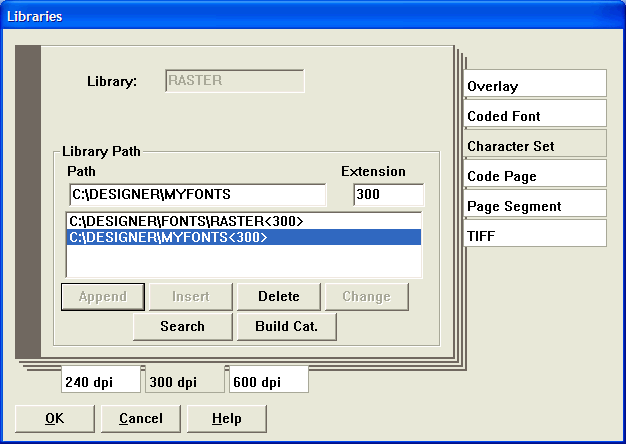
7 Select the Code Page tab on the side.
Set the Path to "C:\DESIGNER\MYFONTS", and then click on the Append button.
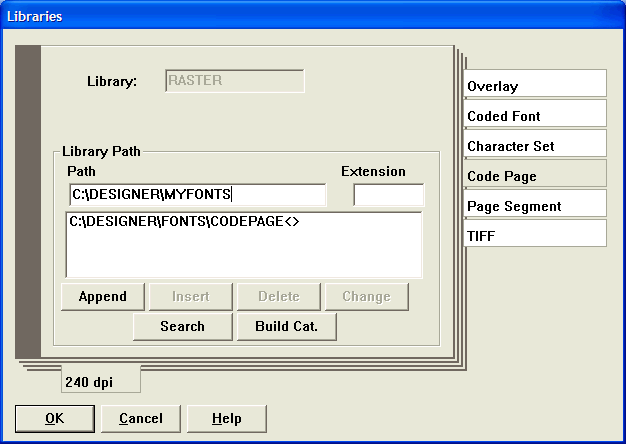
so both "C:\DESIGNER\FONTS\CODEPAGE<>" and "C:\DESIGNER\MYFONTS<>" are listed:
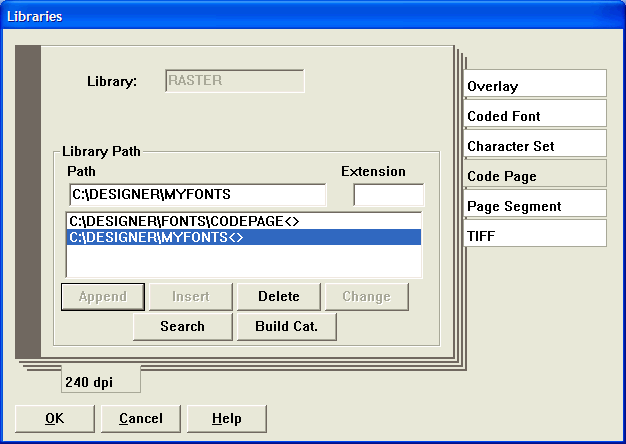
8 Click on the OK button and wait for Infoprint Designer to check all of the font resources. 9 Go to the View/Edit window, click on the Text button on the tool bar, click anywhere within the overlay and look for a Typeface that matches one of the fonts from the MYFONTS library, then a Code page that matches one of the code pages from the MYFONTS library.
For example, if adding an E13B MICR raster font from a third-party hardware or software vendor, the font may be found with a typeface of "MICR E13B", and a code page of "MCR13B E13B":
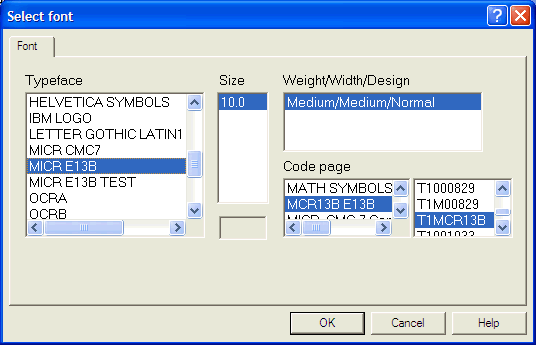
10 Click the OK button to exit the Select font panel.
-
 Adding AFP Outline Fonts to the Infoprint Designer Font Catalog
Follow these step-by-step instructions add raster fonts to the Infoprint Designer font catalog:
1 Create a directory called "MYFONTS" in your DESIGNER directory (such as C:\DESIGNER) and save or unzip the AFP outline font objects to the \DESIGNER\MYFONTS directory. 2 Launch the Infoprint Designer for iSeries product and sign in with your user profile and password, but do not open a project. 3 Select Edit > Preferences from the menu bar and set the Host printer resolution to either 300 or 240, whichever resolution matches your IPDS printer hardware.
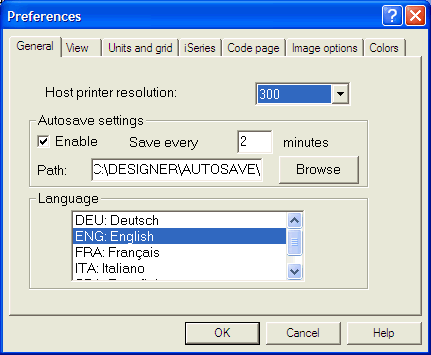
and then click on the OK button.
Note: If printing on an ASCII laser printer using Host Print Transform (HPT), then set the Host printer resolution to 300, since the AFPDS to ASCII Transform code within HPT converts everything to 300 dpi resolution.4 Select Edit > Change Library from the menu bar and select the \DESIGNER\USERISIS\default.lbp file.
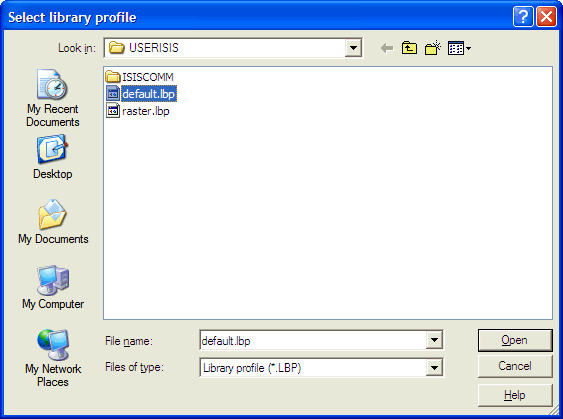
and then click on the Open button.5 Select Defaults > Libraries from the menu bar, select the Coded Font tab on the side.
If adding 300 dpi fonts, then select the 300 dpi tab on the bottom. If adding 240 dpi fonts, then select the 240 dpi tab instead.
Set the Path to "C:\DESIGNER\MYFONTS", and then click on the Append button.
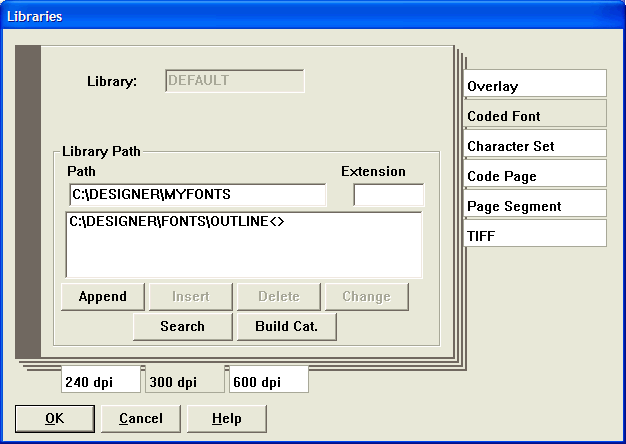
so both "C:\DESIGNER\FONTS<>" and "C:\DESIGNER\MYFONTS<>" paths are listed:
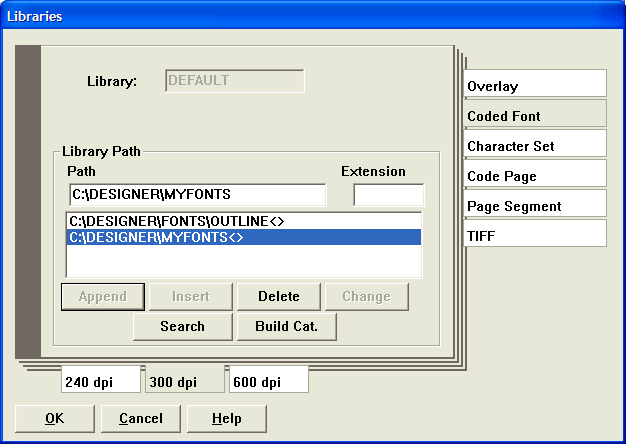
6 Select the Character Set tab on the side.
If adding 300 dpi fonts, then select the 300 dpi tab on the bottom. If adding 240 dpi fonts, then select the 240 dpi tab instead.
Set the Path to "C:\DESIGNER\MYFONTS", set the Extension to 300 or 240 (depending on whether you are adding 300 dpi or 240 dpi fonts), and then click on the Append button.
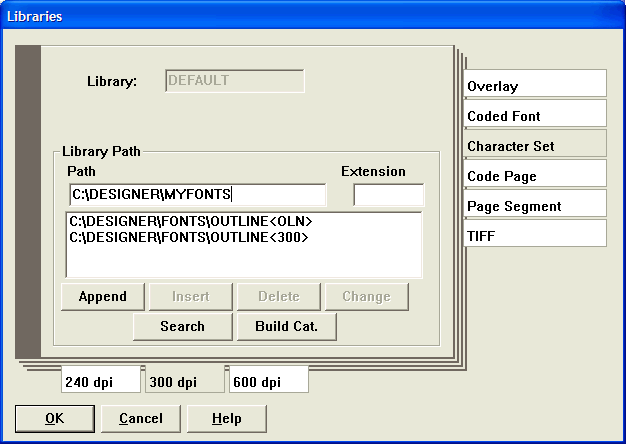
so both "C:\DESIGNER\FONTS\RASTER<300>" and "C:\DESIGNER\MYFONTS<300>" are listed if adding 300 dpi fonts, or both "C:\DESIGNER\FONTS\RASTER<240>" and "C:\DESIGNER\MYFONTS<240>" are listed if adding 240 dpi fonts:
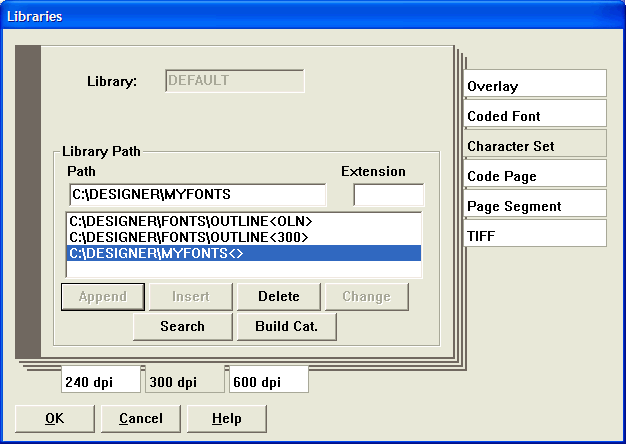
7 Select the Code Page tab on the side.
Set the Path to "C:\DESIGNER\MYFONTS", and then click on the Append button.
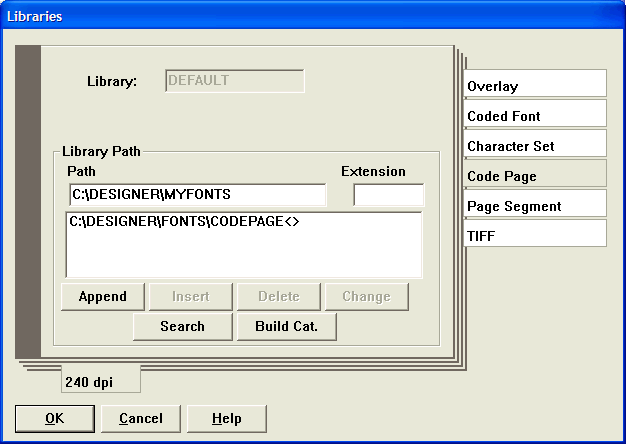
so both "C:\DESIGNER\FONTS\CODEPAGE<>" and "C:\DESIGNER\MYFONTS<>" are listed:
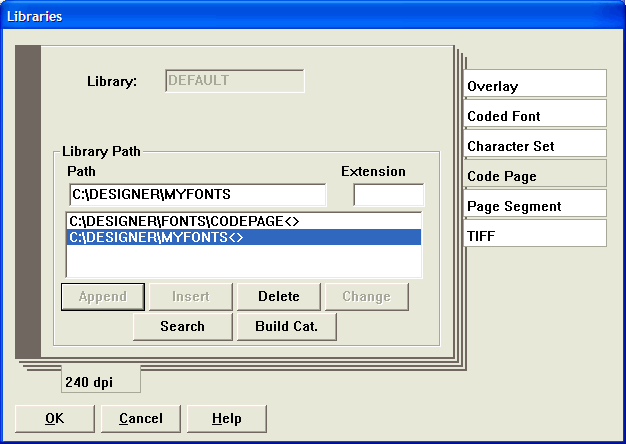
8 Click on the OK button and wait for Infoprint Designer to check all of the font resources. 9 Go to the View/Edit window, click on the Text button on the tool bar, click anywhere within the overlay and look for a Typeface that matches one of the fonts from the MYFONTS library, then a Code page that matches one of the code pages from the MYFONTS library.
For example, if adding an E13B MICR outline font from a third-party hardware or software vendor, the font may be found with a typeface of "E13B MICR Font", and a code page of "MCR13B E13B":
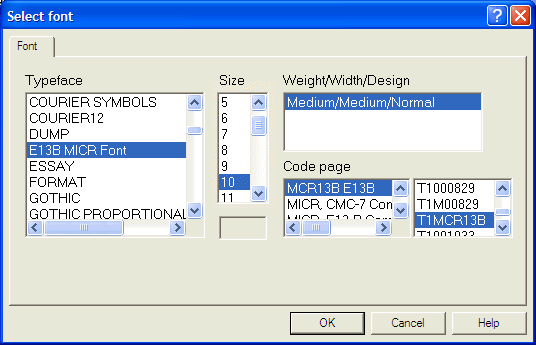
10 Click the OK button to exit the Select font panel.
-
-
 RPG Examples Using Hexadecimal Characters as Constants
The following is an example of coding an IBM RPG/400 program to set hexadecimal (or hex) constants for the MICR characters for Code Page 01032 (MICR, E13-B Combined). The example shows the MICR characters SO600000, SO610000, SO620000, and SO630000 being assigned to Code Points X'5C, X'5B', X'4C', and X'60' (respectively). Some IPDS or ASCII printers might need to use different code points to print the same MICR characters. Testing is required to ensure that the code points used will work with your MICR-capable printers.
************************************************************************
*
* EXAMPLE 1 -- USING 1-BYTE HEXADECIMAL (HEX) CONSTANTS FOR THE MICR
* CHARACTERS FOR CODE PAGE 01032 (MICR, E13-B COMBINED)
************************************************************************
FQSYSPRT O F 132 PRINTER
* CHR 1 MICR CHARACTER SO600000 AT CODE POINT X'5C'
I X'5C' C SO600000
* CHR 1 MICR CHARACTER SO610000 AT CODE POINT X'5B'
I X'5B' C SO610000
* CHR 1 MICR CHARACTER SO620000 AT CODE POINT X'4C'
I X'4C' C SO620000
* CHR 1 MICR CHARACTER SO630000 AT CODE POINT X'60'
I X'60' C SO630000
The following is an example of coding an RPG/400 program to set hexadecimal (or hex) constants for the MICR characters for Code Page 01033 (MICR, CMC-7 Combined). The example shows the MICR characters SO700000, SO710000, SO720000, SO730000, and SO740000 being assigned to Code Points X'50, X'61', X'5B', X'60' and X'5C' (respectively). Some IPDS or ASCII printers might need to use different code points to print the same MICR characters. Testing is required to ensure that the code points used will work with your MICR-capable printers.
************************************************************************
*
* EXAMPLE 2 -- USING 1-BYTE HEXADECIMAL (HEX) CONSTANTS FOR THE MICR
* CHARACTERS FOR CODE PAGE 01033 (MICR, CMC-7 COMBINED)
************************************************************************
FQSYSPRT O F 132 PRINTER
* CHR 1 MICR CHARACTER SO700000 AT CODE POINT X'50'
I X'50' C SO700000
* CHR 1 MICR CHARACTER SO710000 AT CODE POINT X'61'
I X'61' C SO710000
* CHR 1 MICR CHARACTER SO720000 AT CODE POINT X'5B'
I X'5B' C SO720000
* CHR 1 MICR CHARACTER SO730000 AT CODE POINT X'60'
I X'60' C SO730000
* CHR 1 MICR CHARACTER SO740000 AT CODE POINT X'5C'
I X'5C' C SO740000
-
 Using Characters from the Default Code Page on the Power Systems
The previous section provided examples an RPG/400 program to set hexadecimal (or hex) constants for the MICR characters for Code Page 01032 (MICR, E13-B Combined) or Code Page 01033 (MICR, CMC-7 Combined). An alternative to this is to compare the code points for the MICR characters in your MICR Code Page (01001, 01032 or 01033) to the corresponding characters in the default Code Page for your Power Systems (such as USA/Canada - CECP Code Page 00037). Then you can use the corresponding characters rather than their hex values.
The first example shows how to code an RPG/400 program to set hexadecimal (or hex) constants for the MICR characters for Code Page 01032 (MICR, E13-B Combined). The example shows the MICR characters SO600000, SO610000, SO620000, and SO630000 being assigned to Code Points X'5C, X'5B', X'4C', and X'60' (respectively). In USA/Canada CECP Code Page 00037, Code Point X'5C' is an Asterisk character ('*'), Code Point X'5B' is a Dollar Sign character ('$'), Code Point X'4C' is a Less Than character ('<'), and Code Point X'60' is a Hyphen character ('-'). Therefore, character constants of *, $, <, and - could be used for MICR characters SO600000, SO610000, SO620000, and SO630000, assuming the Power Systems has a default Code Page of 00037.
The second example shows how to code an RPG/400 program to set hexadecimal (or hex) constants for the MICR characters for Code Page 01033 (MICR, CMC-7 Combined). The example shows the MICR characters SO700000, SO710000, SO720000, SO730000, and SO740000 being assigned to Code Points X'50, X'61', X'5B', X'60', and X'5C' (respectively). In USA/Canada CECP Code Page 00037, Code Point X'50' is an Ampersand character ('&'), Code Point X'61' is a Forward Slash character ('/'), Code Point X'5B' is a Dollar Sign character ('$'), Code Point X'60' is a Hyphen character ('-'), and Code Point X'5C' is an Asterisk character ('*'). Therefore, character constants of &, /, $, -, and * could be used for MICR characters SO700000, SO710000, SO720000, SO730000, and SO740000, assuming the operating system has a default Code Page of 00037.
Historical Number
22214546
Was this topic helpful?
Document Information
Modified date:
18 December 2019
UID
nas8N1019496