Troubleshooting
Problem
This document is intended to provide a detailed overview of installing multiple Tivoli Endpoints (TMAs) on a Microsoft Cluster Server (MSCS)
Resolving The Problem
Executive Summary
This document is intended to provide CUSTOMER with a detailed overview of installing multiple Tivoli Endpoints (TMAs) on a Microsoft Cluster Server (MSCS). The general requirements for this delivery are as follows:
· Install a Tivoli Endpoint on each physical server in the cluster (2)
· Install a Tivoli Endpoint on the “logical” or “virtual” server in the cluster (or “cluster resource”). This Endpoint to have the hostname and IP address of the virtual server.
· The “logical Endpoint” will “roam” with the cluster resources during a failover – the cluster services will control the startup and shutdown of the Endpoint during a failover.
· Monitor system resources on each physical node.
· Monitor critical applications and services on the logical cluster node.
Note that more specific requirements are outlined in the next section of this document.
The purpose of this document is to clearly demonstrate what has been put in place (or implemented) by Tivoli Services, to provide a detailed document of custom configurations, installation procedures, and information that is generally not provided in user manuals. This information is intended to be a starting place for troubleshooting, extending the current implementation, and documentation of further work.
Short-Term Best Practice
The following points consider Tivoli Software’s short term solution for managing HA cluster environments. It shall be noted that further support for cluster environments will be available with later releases of the product code.
- Endpoint for the physical nodes to represent the physical characteristics (“Physical Endpoint”)
– Does not fail over to the alternate node in the cluster
– Monitors only the underlying infrastructure
- Endpoint for every cluster package, representing the logical characteristics (“Logical Endpoint”)
– Stopped and started under control of HA
– Monitors only the application components within the package or “group”
- Several limitations apply (for instance, Endpoints have different labels and listen on different ports)
- Products
– Tivoli Distributed Monitoring 3.6.2 (w/ patch 23 and 30) and 3.7 (DM CE), Endpoints only
– Tivoli Manager for SAP R/3 2.1 / 2.2
– Tivoli Manager for Oracle 2.0
– Tivoli Manager for DB2 2.1
– Tivoli Manager for Lotus Domino 3.1 / 3.2
- Platforms
– Platform versions as supported by our products today
Installation and Configuration
The complete solution for managing/monitoring the Microsoft Cluster Server (MSCS) involves installing three (3) Tivoli Endpoints on the two physical servers. One “typical” Endpoint will reside on each physical server, while the third endpoint will run where the cluster resource (virtual or logical server) is running. For example, if Node 1 is the “active cluster” or contains the “cluster group” resource, this node will also be running the “logical Endpoint” along side it’s own Endpoint. See the graphic below.
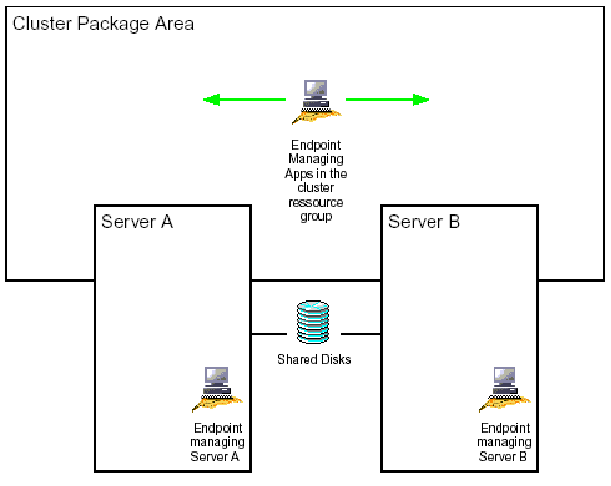
An endpoint is installed on each node to manage the physical components, and we call these the "physical endpoint". This endpoint is installed on the local disk of the system using the standard Tivoli mechanism. This endpoint is installed first, so its instance id is "1" on both physical servers (e.g., \Tivoli\lcf\dat\1).
A second endpoint instance (instance id is "2") is installed on the shared volume / file system. This
Endpoint represents the application that runs in the cluster, and we call it the "application endpoint" or “logical Endpoint”. The endpoints will not share any path / cache content, their disk layout is completely separated.
The logical endpoint will have an endpoint label (parameter lcs.machine_name) that is different from the physical endpoint.
The application endpoint will be configured to listen on a different port than the physical endpoint
(Parameters lcfd_preferred_port, lcfd_alternate_port).
The general steps to implementing this configuration are as follows:
1. Install the Tivoli Endpoint on Node 1, local disk
2. Install the Tivoli Endpoint on Node 2, local disk
3. Manually install the Tivoli Endpoint on the logical server, shared drive F:\ (while logged onto the currently active cluster node).
4. Configure the new LCFD service as a “generic service” in the cluster group (using the Cluster Administrator).
5. Fail over the cluster to Node 2 and register the new LCFD service on this node using the lcfd.exe –i command (along with other options, of course).
Environment Preparation and Configuration
Before beginning the installation, make sure there are no references to “lcfd” in the windows registry. Remove any references to previously installed Endpoints, or you may run into problems during the installation. Note: This is very important to the success of the installation. If there are any references (typically legacy_lcfd), you will need to delete them using regedt32.exe.
Verify we have two-way communication to and from the Tivoli Gateways from the cluster server via hostname and IP address. Do this by updating your name resolution system (DNS, hosts files, etc). We strongly recommend entering the hostname and IP address of the logical node in the hosts file of each physical node. This will locally resolve the logical server’s hostname when issuing the ping –a command.
Finally, please note that this solution works with only version 96 of the Tivoli Endpoint and higher.
Install the Tivoli Endpoint on Node 1
1. Install the Tivoli Endpoint using the standard CD InstallShield setup program on one of the physical nodes in the cluster.
a. We leave the ports as default, although enter optional commands to configure the Endpoint and ensure its proper login.
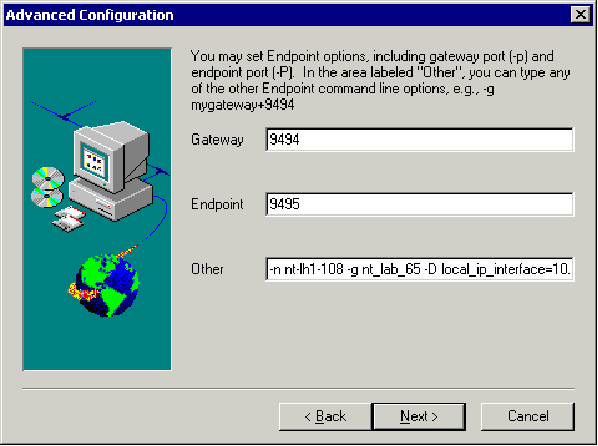
The configuration arguments in the “Other” field are:
-n <ep label> -g <preferred gw> -d3 -D local_ip_interface=<node primary IP> -D bcast_disable=1
b. The Endpoint should install successfully and log in to the preferred Gateway. We can verify the installation and login by issuing the following commands on the TMR or Gateway:
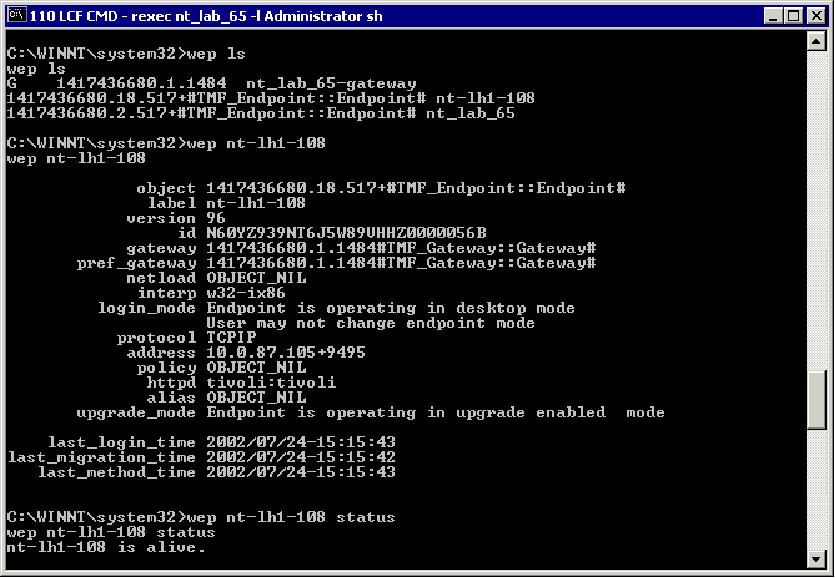
Install the Tivoli Endpoint on Node 2
2. Install the Tivoli Endpoint on the physical node 2 in the cluster. We do this using the same method and options as node 1 (see above).
a. Verify we have a successful installation and login as above.
Manually Install the Tivoli Endpoint on the Virtual Node
NOTE: you will only be able to do this from the “active” cluster server – the non-active node will not have access to the shared volume f:\.
3. On the active node copy only the \Tivoli directory (c:\Program Files\Tivoli) to the root of f:\. Rename f:\Tivoli\lcf\dat\1 to f:\Tivoli\lcf\dat\2. Do not use the “Program Files” naming convention on the f:\ drive.
4. Edit the f:\Tivoli\lcf\dat\2\last.cfg file changing all of the references of c:\Program Files\Tivoli\lcf\dat\1 to f:\Tivoli\lcf\dat\2.
5. On both physical node 1 and the physical node 2, copy the c:\winnt\Tivoli\lcf\1 directory to c:\winnt\Tivoli\lcf\2.
6. On both physical node 1 and the physical node 2 edit the c:\winnt\Tivoli\lcf\2\lcf_env.cmd and lcf_env.sh files replacing all references of c:\Program Files\Tivoli\lcf\dat\1 to f:\Tivoli\lcf\dat2.
7. Remove the lcfd.id, lcfd.sh, lcfd.log, lcfd.bk and lcf.dat files from the f:\Tivoli\lcf\dat\2 directory.
8. Add or change the following entries to the f:\Tivoli\lcf\dat\2\last.cfg file:
lcfd_port=9497
lcfd_preferred_port=9497
lcfd_alternate_port=9498
local_ip_interface=<IP of the virtual cluster>
lcs.login_interfaces=<gw hostname or IP>
lcs.machine_name=<hostname of virtual Cluster>
UDP_interval=30
UDP_attempts=3
login_interval=120
The complete last.cfg file should resemble the following:
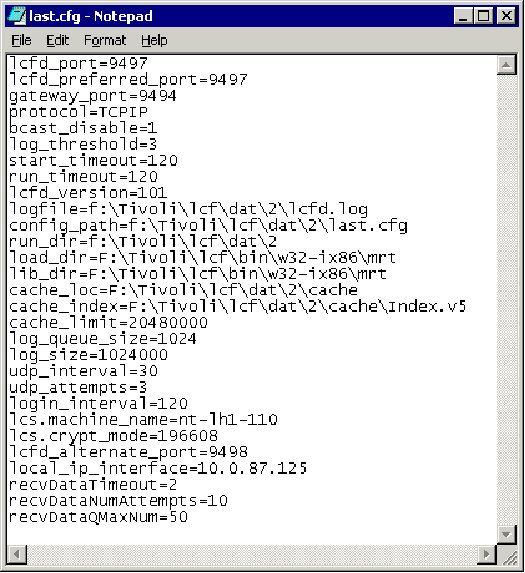
9. Execute the following command:
· f:\Tivoli\lcf\bin\w32-ix86\mrt\lcfd.exe -i -n <virtual_name> -C f:\Tivoli\lcf\dat\2 -P 9497 -g <gateway_label> –D local_ip_interface=<virtual_ip_address>
Note: The IP address and name are irrelevant as long as their label is a unique label with "-n" specified. Every time the endpoint logs in, the gateway registers the IP that contacted it. It will use that IP from that point forward for down calls. A single interface cannot be bound to multiple interface machines, so the routing must be very good, otherwise, every UP call generated or every time the endpoint starts, the IP address will be changed if it differs from the gateway. But, if the endpoint is routing out of an interface that is not reachable by the gateway, then all downcalls will fail, even though the endpoint logged in successfully. This will obviously cause some problems with the endpoint.
10. Set the Endpoint manager login_interval to smaller number. Default=270 New=20. Run the following command on the TMR:
wepmgr set login_interval 20
Setup Physical Node 2 to Run the Logical Endpoint
11. Fail over the cluster to the other physical server, Node 2. Manually failover the server by dragging and dropping the “Cluster Group” from the active server to the non-active server using the Cluster Administrator. You may also need to fail over the disks if they are managed in a separate Resource Group.
12. On Node 2, now the active node (the node which we have NOT yet registered the logical Endpoint), open a command prompt window (CMD) and again run the following command to create and register the lcfd-2 service on this machine:
f:\Tivoli\lcf\bin\w32-ix86\mrt\lcfd.exe -i -n <virtual_name> -C f:\Tivoli\lcf\dat\2 -P 9497 -g <gateway_label> –D local_ip_interface=<virtual_ip_address>
You should see a similar output like this:
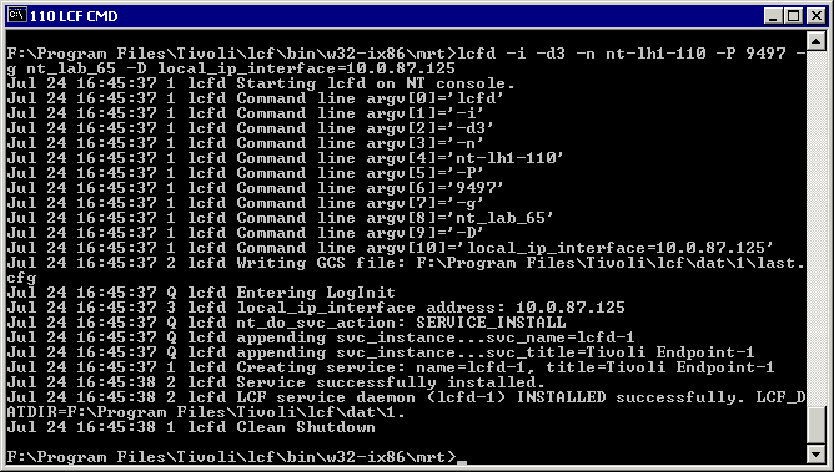
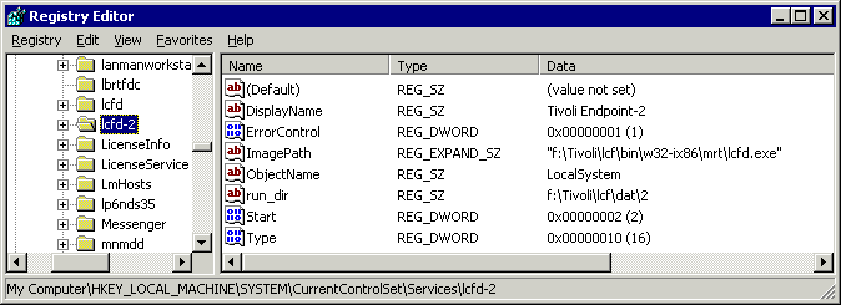
13. Verify the new Service was installed correctly by viewing the services list (use the “net start” command or Control Panel / Services). Also view the new registry entries using the Registry Editor… you will see two entries for the lcfd service, “lcfd” and “lcfd-2”.
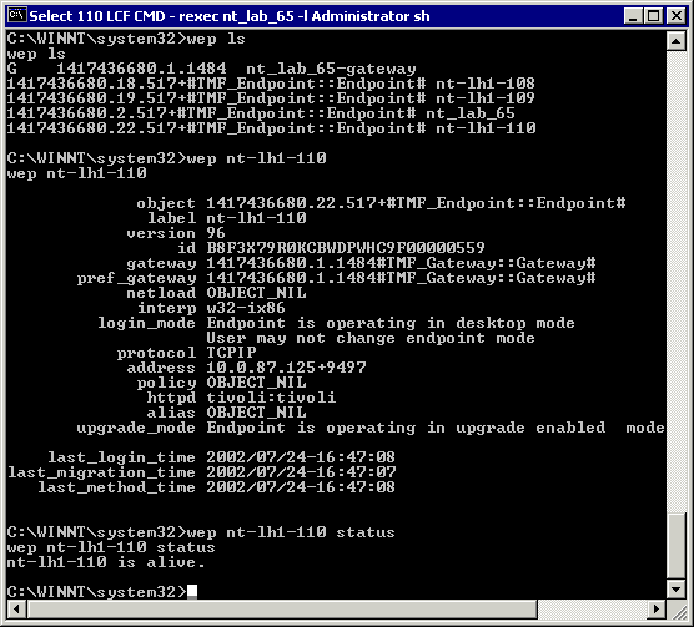
14. Verify the Endpoint successfully started and logged into the Gateway/TMR and that it is reachable…
Configure the Cluster Resources for Failover
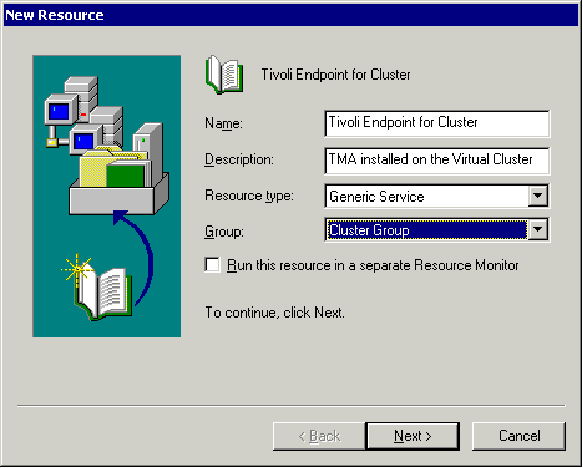
15. Add a new “Resource” to the cluster…
a. Log on to the “active” cluster node and start the Cluster Administrator on using the virtual IP address or hostname.
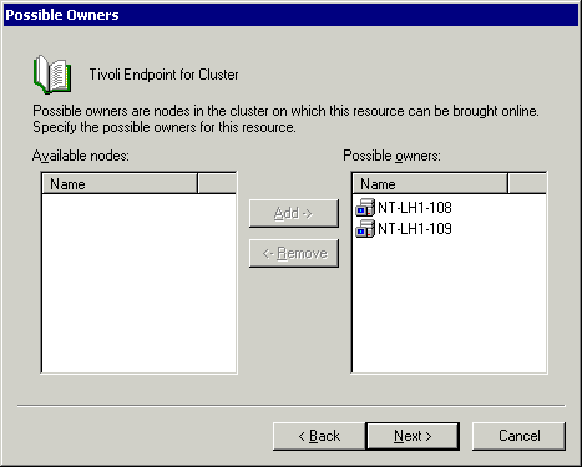
b. Click on Resource, then right-click in the right-pane and select New Resource.

c. Fill in the information as follows in the next dialogues…
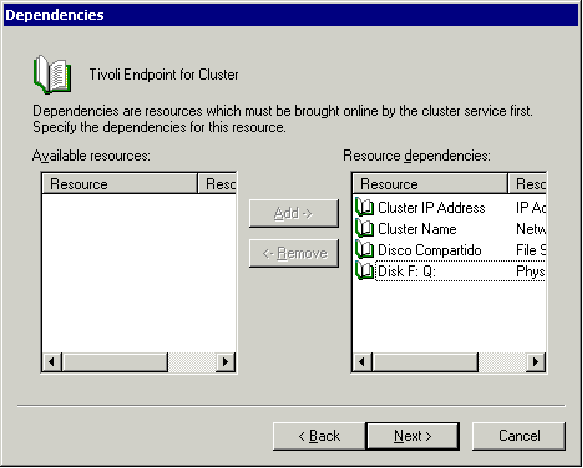
Move all available resources seen below to the “Resources dependencies” box…
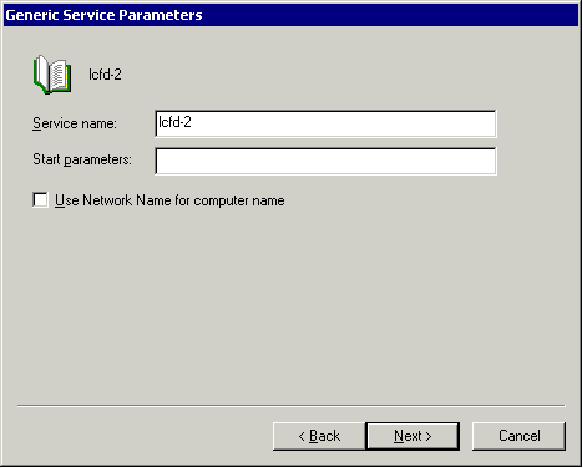
Enter the new service name of the Endpoint just installed (registered)…
You should receive the following message when successful:

16. Finally, we need to finish configuring the new Cluster Resource before we “bring it on-line”.
a. In the Cluster Administrator, right click on the new Generic Service resource, our “Tivoli Endpoint on Cluster”, select Properties.
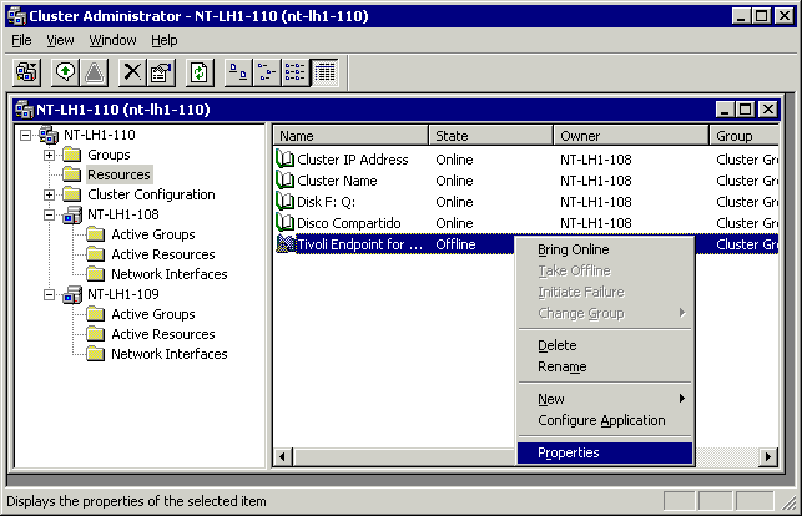
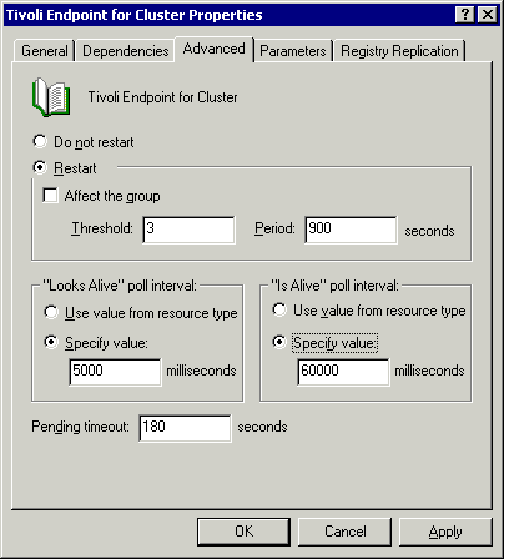
b. Switch to the Advanced tab, uncheck “affect the group”, and click on the two “Specify value” radio buttons as seen below:
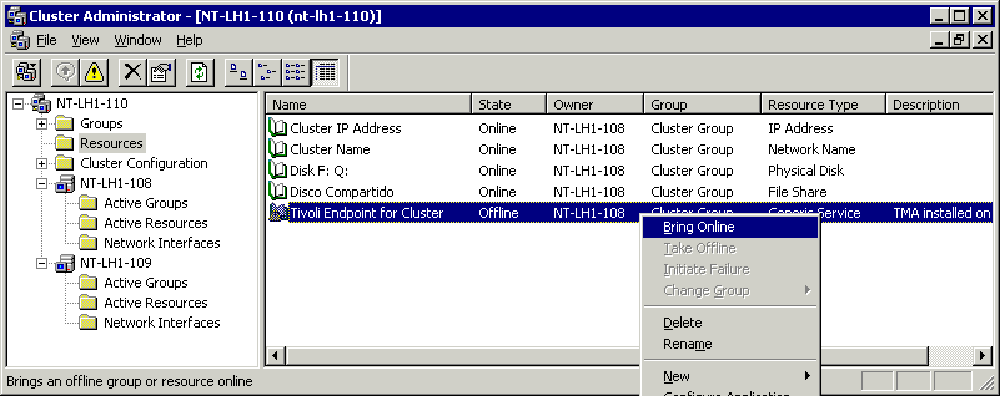
17. Bring the new service resource on-line by right-clicking the resource and selecting “Bring on-line”… You will see the icon first change to the resource “book” with a clock, it will then come on-line and display the standard icon indicating it is on-line.
18. Failover the Cluster to the current failover physical node. Manually failover the server by dragging and dropping the “Cluster Group” from the active server to the non-active server within the Cluster Administrator.
19. Test the failover mechanism and failover of the Cluster Endpoint service.
a. Fail over the server once again using the Cluster Administrator.
b. Once the failover is complete, log into the new active server and verify the Endpoint Service “Tivoli Endpoint-1” is running along side the physical server’s Endpoint “Tivoli Endpoint”.
c. Failover again and do the same.
Uninstalling the Tivoli Endpoint
Un-registering the Endpoint Service
Before uninstalling any of the Endpoints, physical or logical, it is recommended to un-register and remove the Services. The uninstall process tends to get confused as to which service is to be removed and typically removes the first instance, the physical server’s.
To un-register the Tivoli endpoint service is to remove some of the entries in the Windows Registry. The command to do this is:
lcfd.exe –r service name
This removes an existing Windows service from the Service Manager. You will need to supply the correct service name; there will be several LCFD services running (lcfd for the physical servers and lcfd-2 for the logical node).
Un-installation of All Endpoints from the Cluster
1. On the TMR Server run the following commands to remove each of the physical Endpoints and the logical:
wdelep –d <physical node 1>
wdelep –d <physical node 2>
wdelep –d <logical node>
2. On physical Node 1 and Node 2, remove the physical Endpoint’s service (lcfd) and the logical Endpoint’s service (lcfd-2):
C:\Program Files\Tivoli\lcf\bin\w32-ix86\mrt>lcfd -r lcfd
C:\Program Files\Tivoli\lcf\bin\w32-ix86\mrt>lcfd -r lcfd-2
These commands stop and remove the Windows Services and cleans up the registry a bit before we continue to delete the Endpoints.
Note: Make sure to get out of the Tivoli directory, or the files will not delete when we run the next command to delete the files and directories. Issue “cd \”.
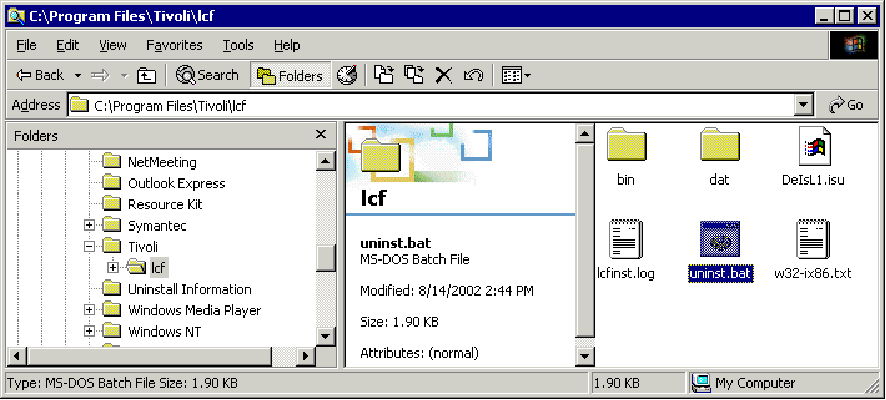
3. From the Windows Explorer on each of the physical nodes, navigate to the C:\Program Files\Tivoli\lcf directory and run the uninst.bat to remove the Endpoint files and directories. Select “Yes” to all questions regarding the removal of various components. When finished, delete the Tivoli directory.
4. From the active Node, use the Windows Explorer to delete the \Tivoli and \etc directories on the shared volume, f:\.
5. Use regedt32.exe to change the permissions (if necessary), then delete the legay lcfd keys from the Windows Registry. You will need to delete the following Keys:
HKEY_LOCAL_MACHINE\SYSTEM\ControlSet001\Enum\Root\LEGACY_LCFD
HKEY_LOCAL_MACHINE\SYSTEM\ControlSet001\Enum\Root\LEGACY_LCFD-2
HKEY_LOCAL_MACHINE\SYSTEM\ControlSet002\Enum\Root\LEGACY_LCFD
HKEY_LOCAL_MACHINE\SYSTEM\ControlSet002\Enum\Root\LEGACY_LCFD-2
HKEY_LOCAL_MACHINE\SYSTEM\ControlSet002\Services\LCFD
Finally, you should search the registry for any instances of “LCFD” and delete them.
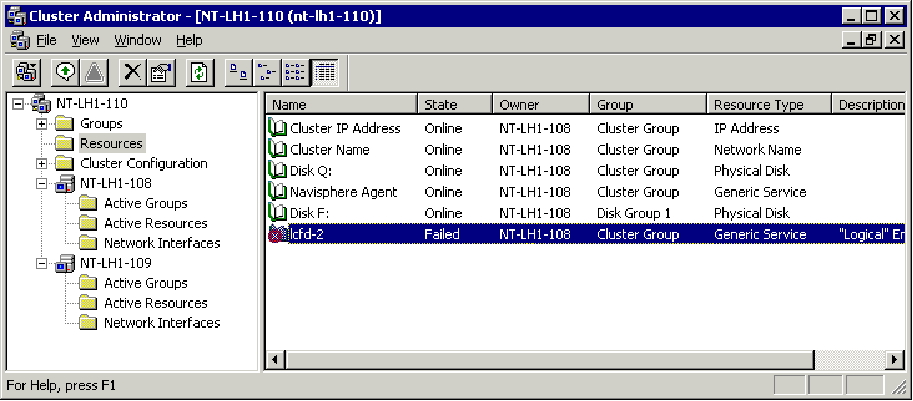
6. Delete the generic service from the Cluster Administrator by clicking on the Resources folder for the cluster, then right-clicking on the lcfd-2 service, then delete:
Appendix 1: Installing a Managed Node on the Cluster
The above documentation covers only EP installation. The following is to help you to install Managed Nodes on Microsoft cluster servers.
Here's what I did to install a MN (in our case used as a Logon-Host and Source-Host)
successfully on a Microsoft Windows 2000 Advanced Server Cluster:
- Activate Site 1 of the Cluster
- Install Trip on Site 1
- Install MN on shared disc (X:\Tivoli) using virtual Hostname of the Cluster
- Reboot Site 1
- Set wlocalhost in environment to the virtual Hostname of the Cluster
- Remove this MN (wrmnode)
- Remove the files from the shared disc (X:\Tivoli)
- TivoliAP, Registry-Keys and oserv-Service are now correctly installed on Site 1
- Activate Site 2
- Install Trip on Site 2
- Install MN again on shared disc (X:\Tivoli) using virtual Hostname of the Cluster
- Reboot Site 2
- TivoliAP, Registry-Keys and oserv-Service are now correctly installed on Site 2
- (at this time "odadmin odlist" shows the IP-Address and hostname of Site 2)
- Change IP-Address of Cluster-MN to the virtual IP-Address (odadmin odlist change_ip)
- Set wlocalhost in environment to the virtual Hostname of the Cluster
- Set odadmin force_bind true for this dispatcher
- Test to stop and start dispatcher
- Register oserv-Service to Cluster-Service for failover
- Test failover
There could be a quicker way than removing MN after install, if you'll keep
the hostname same (as in takeover) with wlocalhost or in other way. In
addition to /Tivoli on shared disk you need to copy
/WINNT/system32/drivers/etc/Tivoli and /etc/Tivoli to the other box. This
worked with me when moved TMR server from T21 to T23:
1. Copy /Tivoli, /etc/Tivoli and /WINNT/system32/drivers/etc/tivoli
directories to a new box (with the same hostname)
2. Source Tivoli environment
3. Install oserv "oinstall -install C:\Tivoli\db\se81508.db\oserv.exe" (see
man page if you want autostart)
3.5 Set variable "EXECDIR="C:/Tivoli/bin; export EXECDIR;"
4. Setup TAP "perl $BINDIR/TAS/install/tap -install" (may have to copy
TivoliAP.dll manually to \WINNT\system32)
5. Reboot
6. Run command net start oserv /-Nali -k%DBDIR% -b%BINDIR%\..
7. Lock-n-loll
Multiple NICs may cause "System error 1067"...
The whole point is skipping MN install with all the products & patches AND
keeping existing customization/configuration.
Product Synonym
Framework;fw;5698fra00
Was this topic helpful?
Document Information
Modified date:
17 June 2018
UID
swg21137018